Überblick
Konfigurator Pro macht aus einem normalen Shopware-Produkt ein Maßprodukt. Kunden geben auf der Produktseite Breite und Höhe oder eine Länge ein, wählen Zusatzleistungen und laden bei Bedarf eine Datei hoch. Der Shop berechnet den Preis sofort und prüft ihn im Warenkorb noch einmal auf dem Server. Alle Angaben landen in der Bestellung und im Fertigungsauftrag für die Werkstatt.
Funktionen
- Drei Berechnungsarten: nach Fläche (m²), nach Länge (laufende Meter) oder über eine Breite-Höhe-Preismatrix.
- Wiederverwendbare Profile: Maßgrenzen, Schrittweiten, Rundung, Mindest- und Höchstmenge, Staffelpreise und Zusatzleistungen einmal festlegen und beliebig vielen Produkten zuweisen.
- Zusatzleistungen mit festem, mengenbezogenem oder prozentualem Aufpreis, als freie Auswahl oder als Auswahlgruppe (genau eine Wahl), optional mit Bild und Info-Symbol.
- Zwei Produktansichten: Studio und Atelier, mit schematischer oder bildbasierter Vorschau. Farben und Schriften kommen aus Ihrem Theme.
- Datei-Upload: optional oder verpflichtend, mit privater Ablage und eigener Download-Berechtigung.
- Bestellungen: eigener Tab mit allen Konfigurationen und ein Fertigungsauftrag als Shopware-Dokument ohne Preise.
- Profile übertragen: Export, Import und Duplizieren als JSON sowie Preismatrizen per CSV aus Excel.
Begriffe
| Begriff | Bedeutung |
|---|---|
| Profil | Enthält alle Regeln für ein Maßprodukt: Berechnungsart, Preise, Maße, Zusatzleistungen, Upload und Darstellung. Ein Profil kann vielen Produkten zugewiesen werden. |
| Berechnungsart | Quadratmeter, laufende Meter oder Preismatrix. Sie bestimmt, wie aus den Maßen der Preis entsteht. |
| Berechnete Menge | Die abgerechnete Fläche oder Länge nach Mindestberechnung und Rundung, z. B. 0,49 m² oder 3,5 m. |
| Zusatzleistung | Eine wählbare oder immer enthaltene Option mit Aufpreis, z. B. „Saum & Ösen“ oder „Klemmträger“. |
| Auswahlgruppe | Mehrere Zusatzleistungen mit demselben Gruppennamen. Der Kunde wählt genau eine davon, z. B. eine Montageart. |
| Preismatrix | Eine Preistabelle nach Breiten- und Höhenstufen in Millimetern. Der Preis gilt pro Stück. |
Overview
Configurator Pro turns a regular Shopware product into a made-to-measure product. On the product page, customers enter width and height or a length, choose additional services and upload a file if required. The shop calculates the price instantly and checks it again on the server in the cart. All details are stored with the order and printed on the production order for your workshop.
Features
- Three calculation types: by area (m²), by length (running metres) or with a width/height price matrix.
- Reusable profiles: define dimension limits, step sizes, rounding, minimum and maximum quantity, tier prices and services once and assign them to any number of products.
- Additional services with fixed, quantity-based or percentage surcharges, as free choices or as a selection group (exactly one choice), optionally with an image and an info icon.
- Two product page layouts: Studio and Atelier, with a schematic or image-based preview. Colours and fonts come from your theme.
- File upload: optional or required, stored privately, with a dedicated download permission.
- Orders: a dedicated tab listing all configurations, and a production order as a Shopware document without prices.
- Transferring profiles: export, import and duplicate as JSON; price matrices via CSV from Excel.
Terms
| Term | Meaning |
|---|---|
| Profile | Holds all rules for a made-to-measure product: calculation type, prices, dimensions, services, upload and presentation. One profile can be assigned to many products. |
| Calculation type | Square metre, running metre or price matrix. It defines how the price is derived from the dimensions. |
| Calculated quantity | The billed area or length after minimum billing and rounding, e.g. 0.49 m² or 3.5 m. |
| Additional service | An optional or always included option with a surcharge, e.g. “Hem & eyelets” or “Clamp brackets”. |
| Selection group | Several services with the same group name. The customer chooses exactly one of them, e.g. a mounting type. |
| Price matrix | A price table by width and height steps in millimetres. The price applies per piece. |
Installation und Einstellungen
Voraussetzungen
- Shopware 6.7, selbst gehostet, mit Storefront und Administration.
- PHP 8.2 oder neuer.
- Keine externen Dienste oder Inhalte von fremden Servern.
Installation
- In der Administration Erweiterungen › Meine Erweiterungen öffnen und „Konfigurator Pro“ installieren (aus dem Shopware Store oder per „Erweiterung hochladen“ als ZIP).
- Die Erweiterung aktivieren. Dabei richtet sie auch den Dokumenttyp „Fertigungsauftrag“ mit eigenem Nummernkreis ein.
- Die Administration neu laden. Der Menüpunkt Kataloge › Konfigurator Pro erscheint.
Plugin-Einstellungen
Unter Erweiterungen › Meine Erweiterungen › Konfigurator Pro › Konfigurieren:
| Einstellung | Wirkung |
|---|---|
| Konfigurator in diesem Verkaufskanal aktivieren | Je Verkaufskanal, Standard: aktiv. Ist ein Kanal deaktiviert, erscheint dort kein Konfigurator. |
| Verwaiste Uploads löschen nach (Stunden) | Standard: 24. Nie bestellte Dateien werden danach automatisch gelöscht; solange die Position im Warenkorb liegt, verlängert sich die Frist. |
| Privates Bestellarchiv bei Datenlöschung erhalten | Standard: aktiv, unter „Alle Verkaufskanäle“ einstellen. Siehe Deinstallation und Daten. |
Benutzerrechte
Unter Einstellungen › Benutzer & Rechte › Rollen finden Sie im Bereich Kataloge den Eintrag „Konfigurator Pro – Profile“ mit den Stufen Ansehen, Bearbeiten, Erstellen und Löschen. Das Herunterladen von Kundendateien ist eine eigene, zusätzliche Berechtigung. Den Tab „Konfigurator Pro“ und den Fertigungsauftrag sehen alle Benutzer, die Bestellungen ansehen dürfen.
| Berechtigung | Erlaubt |
|---|---|
| Konfigurator Pro – Profile | Profile, Preismatrizen und Zuweisungen ansehen, bearbeiten, anlegen oder löschen. |
| Zusätzliche Berechtigungen › Konfigurator Pro › Kundendateien herunterladen | Hochgeladene Kundendateien in Bestellungen herunterladen. Administratoren haben dieses Recht immer. |
Installation and settings
Requirements
- Shopware 6.7, self-hosted, with Storefront and Administration.
- PHP 8.2 or later.
- No external services or content from third-party servers.
Installation
- In the Administration, open Extensions › My extensions and install “Configurator Pro” (from the Shopware Store or as a ZIP via “Upload extension”).
- Activate the extension. This also sets up the “Production order” document type with its own number range.
- Reload the Administration. The menu entry Catalogues › Configurator Pro appears.
Extension settings
Under Extensions › My extensions › Configurator Pro › Configure:
| Setting | Effect |
|---|---|
| Enable configurator in this sales channel | Per sales channel, default: on. If a channel is disabled, no configurator is shown there. |
| Delete orphan uploads after (hours) | Default: 24. Files that were never ordered are deleted automatically afterwards; while the item is in a cart, the period is extended. |
| Keep a private order archive when removing plugin data | Default: on, set under “All sales channels”. See Uninstalling and data. |
User permissions
Under Settings › Users & permissions › Roles, the Catalogues section contains “Configurator Pro – profiles” with the levels view, edit, create and delete. Downloading customer files is a separate, additional permission. The “Configurator Pro” tab and the production order are visible to all users who may view orders.
| Permission | Allows |
|---|---|
| Configurator Pro – profiles | Viewing, editing, creating or deleting profiles, price matrices and assignments. |
| Additional permissions › Configurator Pro › Download customer files | Downloading uploaded customer files in orders. Administrators always have this permission. |
Schnellstart in fünf Minuten
- Kataloge › Konfigurator Pro › Profil anlegen öffnen.
- Unter Schnellstart eine Vorlage wählen: „Fläche / Zuschnitt“, „Druck mit Datei“ oder „Meterware“. Die Vorlage füllt Berechnungsart, Maße und Upload sinnvoll vor.
- Unter Grundlagen einen Namen eintragen.
- Unter Preise den Preis pro Einheit eintragen, z. B. 39 € pro m². Die Beispielrechnung unten zeigt sofort, was ein Kunde bezahlt.
- Unter Zuweisungen ein Produkt oder eine Kategorie wählen.
- Unter Grundlagen „Aktiv“ einschalten und oben Speichern.
- Die Produktseite im Shop öffnen: Der Konfigurator erscheint anstelle der normalen Kaufbox.
Quick start in five minutes
- Open Catalogues › Configurator Pro › Add profile.
- Under Quick start, pick a template: “Area / cut to size”, “Print with file” or “Sold by length”. It pre-fills calculation type, dimensions and upload.
- Enter a name under Basics.
- Under Pricing, enter the price per unit, e.g. €39 per m². The calculation example at the bottom shows right away what a customer pays.
- Under Assignments, select a product or category.
- Switch on “Active” under Basics and click Save at the top.
- Open the product page in the Storefront: the configurator replaces the standard buy box.

Ein Profil einrichten
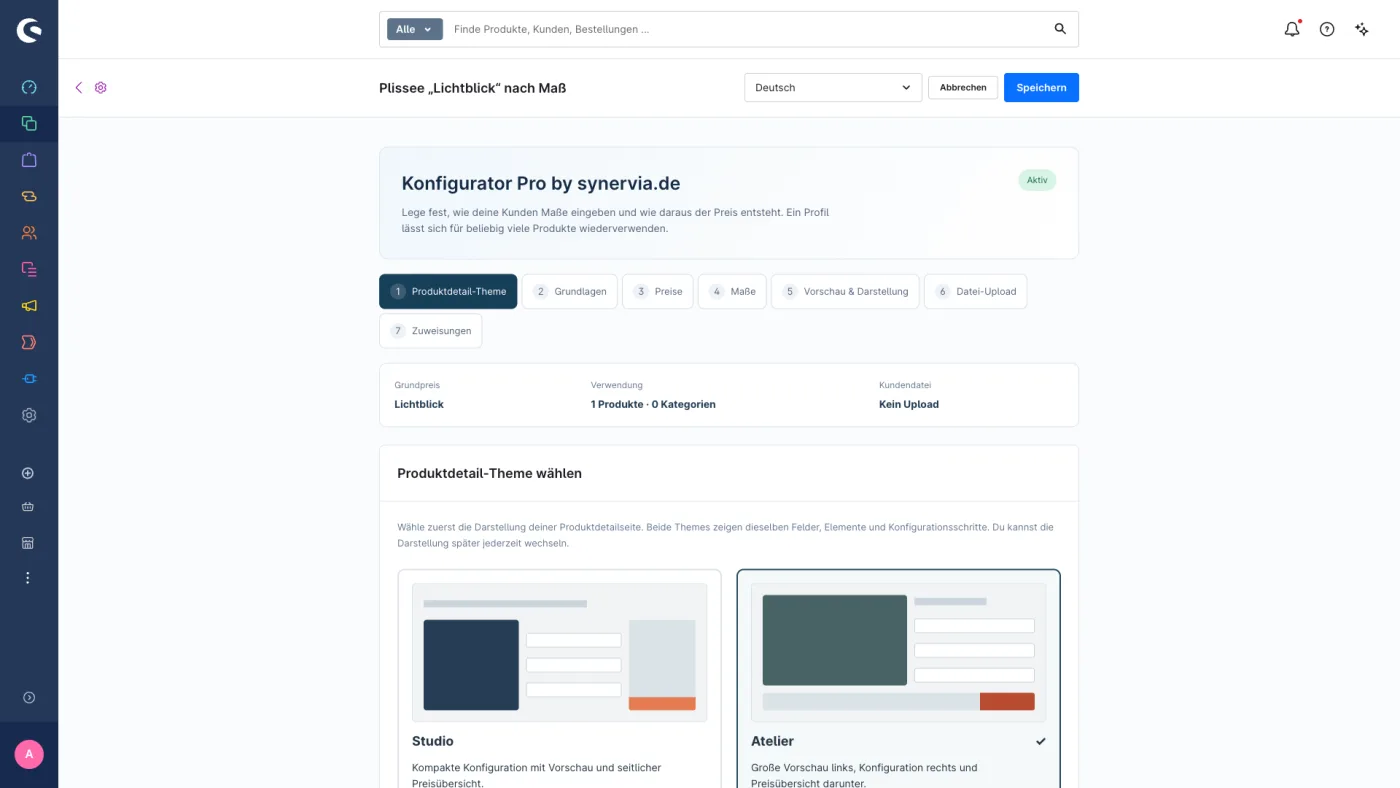
Ein Profil wird in sieben Bereichen eingerichtet. Oben zeigt eine Zusammenfassung Grundpreis, Verwendung und Kundendatei; mit Weiter und Zurück wechseln Sie zwischen den Bereichen. Gespeichert wird immer oben mit Speichern.
Produktdetail-Theme
Hier wählen Sie, wie die Produktseite aussieht. Beide Ansichten zeigen dieselben Felder und rechnen gleich; Sie können jederzeit wechseln.
| Ansicht | Aufbau |
|---|---|
| Studio | Kompakte Konfiguration mit Vorschau und seitlicher Preisübersicht. |
| Atelier | Große Vorschau links, Konfiguration rechts, Preisübersicht darunter. |
Grundlagen
| Feld | Bedeutung |
|---|---|
| Name | Name des Profils; erscheint in der Bestellung und im Fertigungsauftrag. |
| Aktiv | Nur aktive Profile erscheinen im Shop. |
| Berechnungstyp | Quadratmeter, Laufende Meter oder Preismatrix – Maßprodukte. |
| Storefront-Hinweistext | Kurzer Text unter dem Produktnamen, z. B. „Breite und Höhe bestimmen den Preis.“ |
| Priorität | Unter „Erweiterte Einstellungen“. Entscheidet, welches Profil gilt, wenn mehrere auf dasselbe Produkt passen (siehe Zuweisungen). |
| Interne Beschreibung | Nur für Sie sichtbar. |
Preise, Staffeln und Zusatzleistungen
| Feld | Bedeutung |
|---|---|
| Preis pro Einheit | Preis pro m² bzw. pro Meter in der Standardwährung des Shops. Andere Währungen werden automatisch umgerechnet. |
| Preiseingabe | Brutto oder netto. Shopware rechnet je nach Kunde und Verkaufskanal richtig um. |
| Mindestberechnung | Diese Fläche oder Länge wird mindestens berechnet, auch bei kleineren Maßen. |
| Maximale Berechnung | Größere Konfigurationen werden abgelehnt. Leer lassen für keine Obergrenze. |
| Schrittweite (Menge) und Rundungsregel | Keine Rundung, aufrunden oder abrunden auf die Schrittweite, kaufmännisch runden oder immer die Mindestmenge. Beispiel: Schrittweite 0,1 und „Aufrunden“ macht aus 1,12 m² abgerechnete 1,2 m². |
Staffelpreise: Mit „Mengenabhängige Preise verwenden“ legen Sie Stufen an, z. B. ab 5 m² 35 € pro m². Staffeln gelten für die gesamte berechnete Menge; außerhalb der Stufen gilt der Grundpreis. Im Matrixmodus gibt es keine Staffeln.
Zusatzleistungen legen Sie mit „Zusatzleistung hinzufügen“ an:
| Feld | Bedeutung |
|---|---|
| Bezeichnung für Kunden | Name im Shop, im Warenkorb und in der Bestellung. |
| Art des Aufpreises | Einmal pro Konfiguration, pro m² bzw. Meter oder Prozent vom Grundbetrag. Bei Preismatrizen: einmal pro Konfiguration oder Prozent. |
| Aufpreis | Betrag bzw. Prozentsatz; 0 ist erlaubt, z. B. für eine kostenlose Standardausführung. |
| Immer enthalten / verpflichtend | Wird immer berechnet und kann vom Kunden nicht abgewählt werden. |
| Auswahlgruppe (optional) | Alle aktiven Optionen mit exakt gleichem Gruppennamen bilden eine Gruppe; der Kunde wählt genau eine. Die erste Option ist vorausgewählt. |
| Bild | Hat mindestens eine Zusatzleistung ein Bild, zeigt der Shop alle als Bildkacheln. Empfohlen: quadratisch, ab 400 × 400 px. |
| Info-Symbol | Überschrift, formatierter Text und optionales Bild, oder eine Shopseite aus den Erlebniswelten. Ohne Inhalt erscheint kein Symbol. |
Prozentaufschläge beziehen sich auf den Grundbetrag ohne andere Aufpreise. Erst danach wird mit der Stückzahl multipliziert.
Berechnung ausprobieren: Unten im Bereich Preise rechnen Sie mit Beispielmaßen nach, was ein Kunde zahlt, einschließlich der Pflichtleistungen. Optionale Leistungen wählt der Kunde im Shop.
Maße
| Feld | Bedeutung |
|---|---|
| Eingabeeinheit | mm, cm oder m. In dieser Einheit gibt der Kunde die Maße ein. Berechnet wird immer in m² bzw. Metern, Preismatrizen immer in Millimetern. |
| Min, Max, Standard, Schrittweite | Je Achse (Breite und Höhe bzw. Länge): kleinstes und größtes Maß, der vorausgefüllte Wert und der erlaubte Eingabeschritt. |
| Info-Symbole | Die Felder Breite, Höhe und Länge können ein eigenes Info-Symbol erhalten, z. B. mit einer Anleitung zum Messen. |
Vorschau & Darstellung
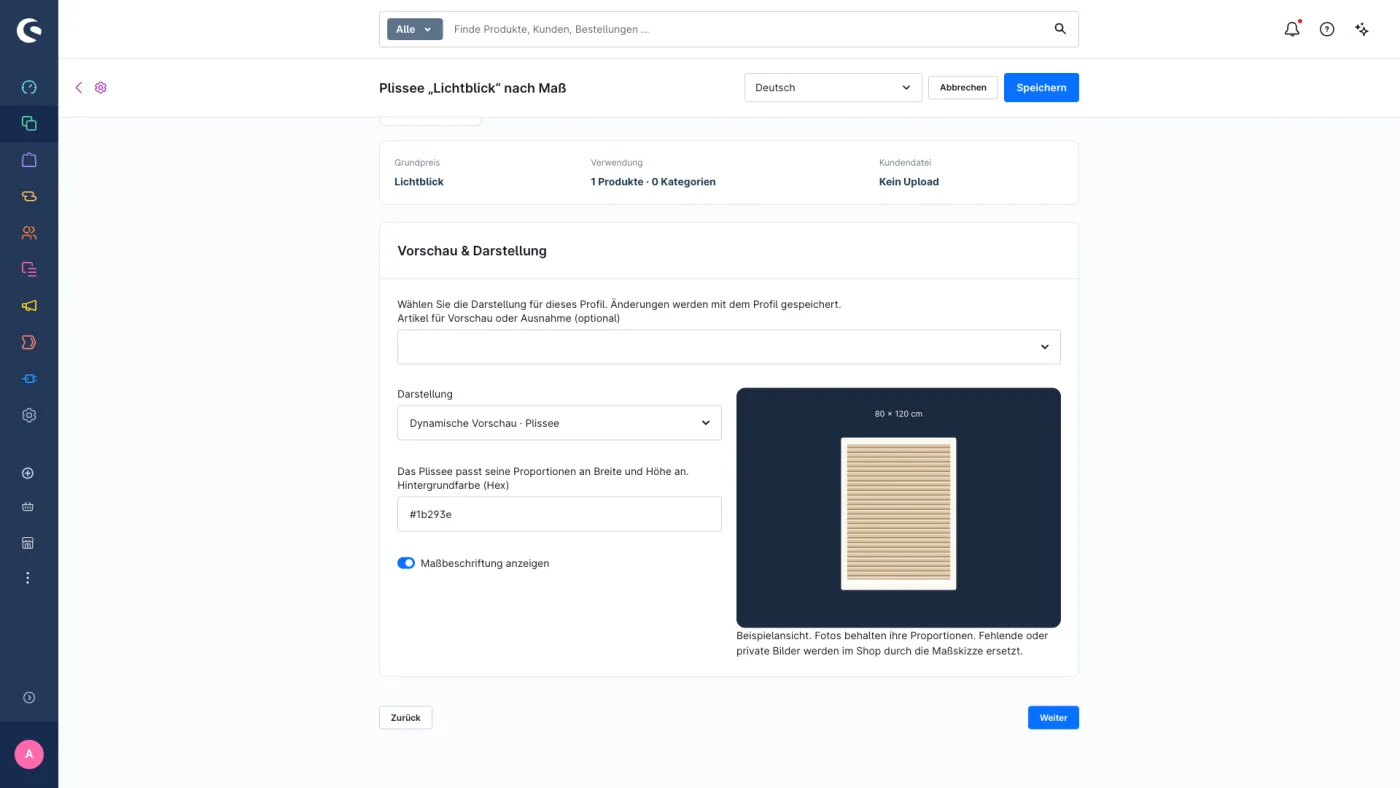
Hier legen Sie fest, was im Vorschaubereich der Produktseite zu sehen ist:
| Option | Darstellung |
|---|---|
| Maßskizze | Neutrale Darstellung mit den eingegebenen Maßen. |
| Dynamische Vorschau · Plissee | Ein Plissee, das seine Proportionen an Breite und Höhe anpasst. |
| Vorlagenbibliothek | Zeichnungen für Plissee, Rollo, Gardinen & Vorhänge und Platte. |
| Produkt-Hauptbild | Automatisch das Hauptbild des jeweiligen Artikels. |
| Eigenes Bild | Ein Bild aus der Medienverwaltung. |
Außerdem einstellbar: Hintergrundfarbe, vollständige Bildanzeige oder Bildausschnitt sowie die Maßbeschriftung. Fehlt ein Bild, zeigt der Shop die Maßskizze.
Ausnahmen für einzelne Artikel: Oben einen Artikel wählen und „Eigene Darstellung für diesen Artikel“ einschalten. Die Ausnahme gilt nur, wenn dieses Profil für den Artikel aktiv ist.
Datei-Upload
| Feld | Bedeutung |
|---|---|
| Dateiupload aktiv / Upload verpflichtend | Optional oder Pflicht. Bei Pflicht kann der Kunde erst nach dem Hochladen bestellen. |
| Erlaubte Dateiendungen | Kommagetrennt, z. B. pdf, ai, eps, jpg, png, zip. |
| Max. Dateigröße (MB) | Wird schon im Browser vor dem Hochladen geprüft. Technische Obergrenze: 500 MB; Limits Ihres Hostings gelten zusätzlich. |
| Upload-Hinweistext / Upload-Fehlertext | Eigene Texte für Kunden, z. B. zu Druckdaten-Anforderungen. |
Pro Konfiguration ist eine Datei möglich; mehrere Druckdaten lassen sich als ZIP bündeln. Während des Hochladens zeigt der Shop einen Fortschrittsbalken.
Zuweisungen
Wählen Sie Produkte und/oder Kategorien. Welches Profil für ein Produkt gilt, entscheidet diese Reihenfolge:
- Zuweisung direkt an die Variante bzw. das Produkt,
- Zuweisung an den Hauptartikel (gilt für alle seine Varianten),
- Zuweisung an eine Kategorie des Produkts.
Innerhalb einer Stufe gewinnt die höhere Priorität, danach das zuletzt geänderte Profil. Pro Produkt wird genau ein aktives Profil angewendet.
Setting up a profile
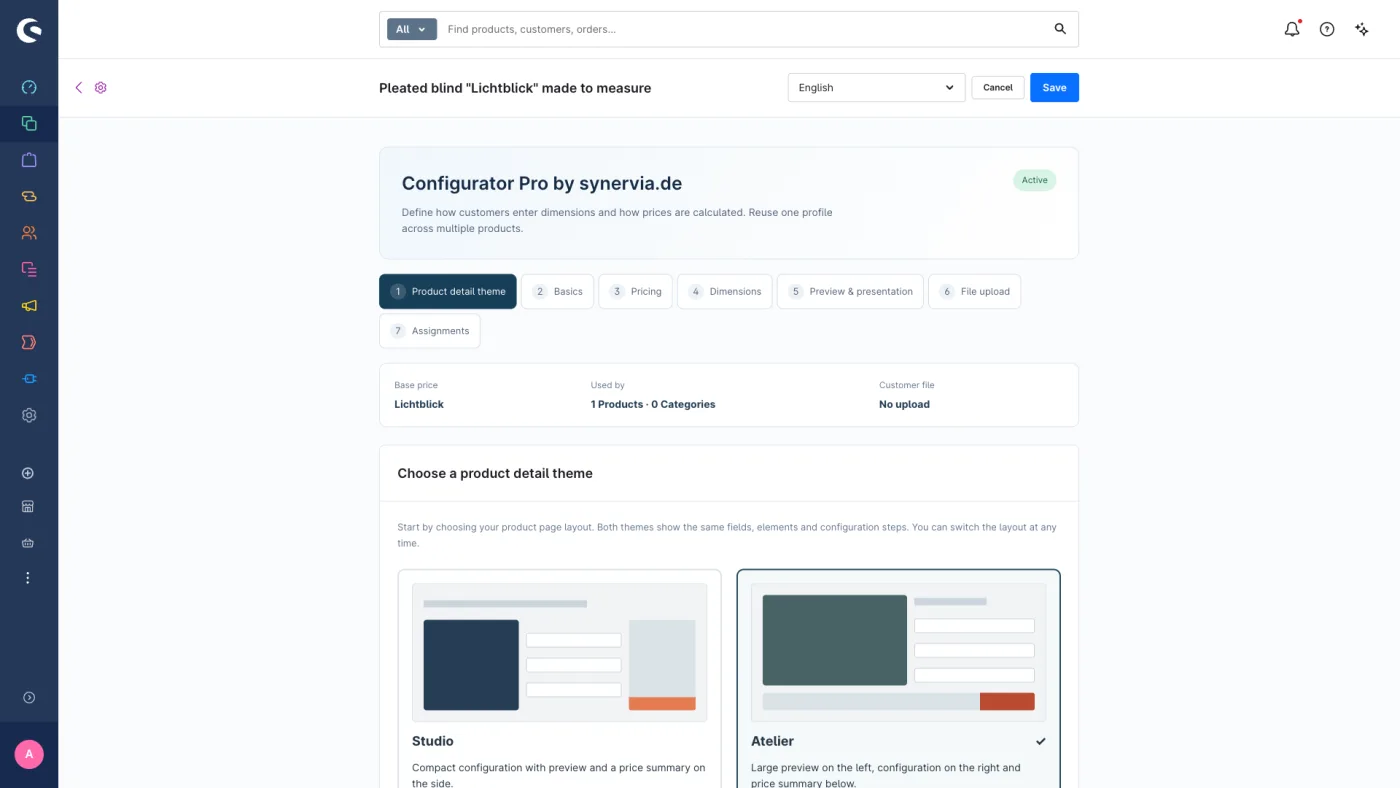
A profile is set up in seven sections. A summary at the top shows base price, usage and customer file; use Continue and Back to move between sections. Always save with Save at the top.
Product detail theme
Choose the look of the product page. Both layouts show the same fields and calculate identically; you can switch at any time.
| Layout | Structure |
|---|---|
| Studio | Compact configuration with preview and a price summary on the side. |
| Atelier | Large preview on the left, configuration on the right, price summary below. |
Basics
| Field | Meaning |
|---|---|
| Name | Profile name; shown in the order and on the production order. |
| Active | Only active profiles appear in the Storefront. |
| Calculation type | Square meter, Running meter or Price matrix – made to measure. |
| Storefront help text | Short text below the product name, e.g. “Width and height determine the price.” |
| Priority | Under “Advanced settings”. Decides which profile applies when several match the same product (see Assignments). |
| Internal description | Visible to you only. |
Pricing, tiers and services
| Field | Meaning |
|---|---|
| Price per unit | Price per m² or per metre in the shop’s default currency. Other currencies are converted automatically. |
| Price input mode | Gross or net. Shopware converts correctly for each customer and sales channel. |
| Minimum calculation | This area or length is always billed, even for smaller dimensions. |
| Maximum calculation | Larger configurations are rejected. Leave empty for no upper limit. |
| Step size (quantity) and rounding rule | No rounding, round up or down to the step, commercial rounding or always the minimum quantity. Example: step 0.1 with “Round up to step” bills 1.12 m² as 1.2 m². |
Tier prices: With “Use quantity-based pricing” you add tiers, e.g. from 5 m² at €35 per m². Tiers apply to the entire calculated quantity; outside the tiers, the base price applies. Price matrices have no tiers.
Use “Add service” to create additional services:
| Field | Meaning |
|---|---|
| Customer-facing name | Name in the Storefront, cart and order. |
| Surcharge type | Once per configuration, per m² or metre, or a percentage of the base total. With price matrices: once per configuration or percentage. |
| Surcharge | Amount or percentage; 0 is allowed, e.g. for a free standard version. |
| Always included / required | Always charged; the customer cannot deselect it. |
| Selection group (optional) | All active options with exactly the same group name form a group; the customer chooses exactly one. The first option is preselected. |
| Image | If at least one service has an image, the Storefront shows all of them as image tiles. Recommended: square, at least 400 × 400 px. |
| Info icon | A heading, formatted text and optional image, or a shop page from Shopping Experiences. Without content, no icon is shown. |
Percentage surcharges refer to the base total without other surcharges. Only then is the result multiplied by the quantity.
Try the calculation: At the bottom of Pricing, enter sample dimensions to see what a customer pays, including required services. Optional services are chosen by the customer in the Storefront.
Dimensions
| Field | Meaning |
|---|---|
| Input unit | mm, cm or m. Customers enter their dimensions in this unit. Calculation always uses m² or metres; price matrices always use millimetres. |
| Min, max, default, step | Per axis (width and height, or length): smallest and largest size, the pre-filled value and the allowed input step. |
| Info icons | Width, height and length can each have an info icon, e.g. with measuring instructions. |
Preview & presentation
Define what the preview area on the product page shows:
| Option | Presentation |
|---|---|
| Dimension sketch | A neutral drawing with the entered dimensions. |
| Dynamic preview · pleated blind | A pleated blind that adapts its proportions to width and height. |
| Template library | Drawings for pleated blind, roller blind, curtains & drapes and panel. |
| Product cover image | Automatically the cover image of the respective product. |
| Custom image | An image from the media library. |
You can also set the background colour, full image or crop, and the dimension labels. If an image is missing, the Storefront shows the dimension sketch.
Product overrides: select a product at the top and switch on “Use a different presentation for this product”. The override only applies while this profile is active for the product.

File upload
| Field | Meaning |
|---|---|
| File upload enabled / Upload required | Optional or required. If required, the customer can only order after uploading. |
| Allowed file extensions | Comma separated, e.g. pdf, ai, eps, jpg, png, zip. |
| Max. file size (MB) | Checked in the browser before uploading. Technical maximum: 500 MB; your hosting limits apply as well. |
| Upload help text / Upload error text | Your own texts for customers, e.g. on print data requirements. |
One file per configuration; several print files can be bundled as a ZIP. A progress bar is shown while uploading.
Assignments
Select products and/or categories. The profile that applies to a product is decided in this order:
- assignment directly to the variant or product,
- assignment to the parent product (applies to all its variants),
- assignment to one of the product’s categories.
Within a level, the higher priority wins, then the most recently changed profile. Exactly one active profile is applied per product.
Preismatrizen
Für Produkte wie Plissees oder Rollos, deren Preis aus einer Tabelle nach Breite und Höhe stammt, wählen Sie unter Grundlagen den Berechnungstyp Preismatrix – Maßprodukte.
Matrix anlegen
- Unter Preise eine vorhandene Matrix wählen oder Neue Matrix anlegen und einen Namen vergeben, z. B. „Plissee – Preisgruppe 1“.
- Breiten- und Höhenobergrenzen in Millimetern eintragen, aufsteigend und durch Komma getrennt. Neue Größenstufen prüfen zeigt die neue Tabelle; bestehende Kombinationen behalten ihren Preis.
- Preise in der Tabelle eintragen.
Xbedeutet „nicht lieferbar“, 0 ist ein gültiger Nullpreis. Leere Zellen sind nicht erlaubt. - Mit Testbreite und Testhöhe den Preis für beliebige Maße prüfen.
- Matrix speichern, danach oben das Profil speichern.

Mit Excel arbeiten
- Für Excel exportieren erzeugt eine CSV-Datei (UTF-8, Semikolon, Dezimalkomma), die Excel direkt öffnet.
- Die erste Zelle
height_mm/width_mmnicht ändern. Erste Zeile: Breitenobergrenzen; erste Spalte: Höhenobergrenzen. - Preise ohne Währungssymbol und Tausendertrennzeichen, mit höchstens zwei Nachkommastellen. Für nicht lieferbare Kombinationen
X. - Als CSV UTF-8 speichern und mit CSV importieren einlesen. Vor dem Übernehmen zeigt eine Vorschau die neue Tabelle; der Import ersetzt die ganze Matrix im Entwurf.
- Bis zu 200 × 200 Stufen und 2 MB. Excel-Dateien (.xlsx) und Formeln werden nicht eingelesen.
Berechnungsregel
Für jede Achse gilt die kleinste Obergrenze, die das Maß einschließt. Beispiel: 735 × 1240 mm nutzt die Spalte „bis 800 mm“ und die Zeile „bis 1500 mm“. Es wird nicht interpoliert und keine Fläche berechnet. Überschreitet ein Maß die Tabelle oder steht dort X, gibt es keinen Preis und keine Bestellung.
Der Zellenpreis ist ein Preis pro Stück. Dazu kommen die gewählten Aufpreise. Die Bestellung speichert Matrixname, Größenstufe und Preisstand; spätere Änderungen an der Matrix ändern bestehende Bestellungen nicht.
Price matrices
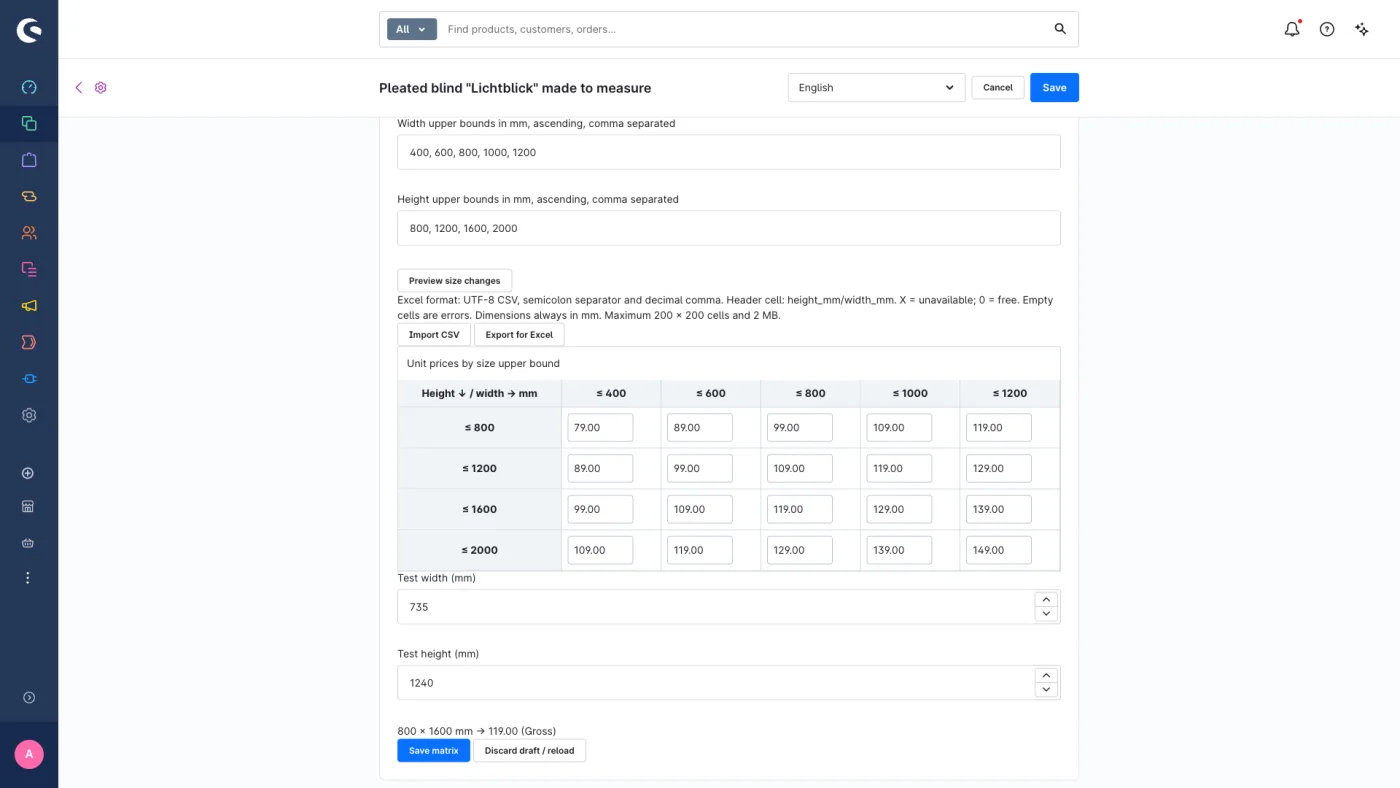
For products such as pleated or roller blinds, whose price comes from a width/height table, choose the calculation type Price matrix – made to measure under Basics.
Creating a matrix
- Under Pricing, select an existing matrix or click New matrix and give it a name, e.g. “Pleated blind – price group 1”.
- Enter width and height upper bounds in millimetres, ascending and comma separated. Preview size changes shows the new table; existing combinations keep their price.
- Enter prices in the table.
Xmeans “unavailable”, 0 is a valid zero price. Empty cells are not allowed. - Use test width and test height to check the price for any size.
- Click Save matrix, then save the profile at the top.
Working with Excel
- Export for Excel creates a CSV file (UTF-8, semicolon, decimal comma) that Excel opens directly.
- Keep the first cell
height_mm/width_mmunchanged. First row: width upper bounds; first column: height upper bounds. - Prices without currency symbol or thousands separator, with at most two decimal places. Use
Xfor unavailable combinations. - Save as CSV UTF-8 and load it with Import CSV. A preview shows the new table before it is applied; the import replaces the entire matrix in the draft.
- Up to 200 × 200 steps and 2 MB. Excel files (.xlsx) and formulas are not imported.
Calculation rule
For each axis, the smallest upper bound that includes the entered size is used. Example: 735 × 1240 mm uses the column “up to 800 mm” and the row “up to 1500 mm”. There is no interpolation and no area calculation. If a size exceeds the table or hits X, there is no price and no order.
The cell price is a price per piece; selected surcharges are added. The order stores matrix name, size step and price revision, so later matrix changes do not alter existing orders.
Der Konfigurator im Shop
Ist einem Produkt ein aktives Profil zugewiesen, ersetzt der Konfigurator auf der Produktseite Bildergalerie, Kaufbox und Produktüberschrift. Beschreibung, Bewertungen und weitere Inhalte der Erlebniswelt bleiben darunter erhalten.
Ablauf für Kunden
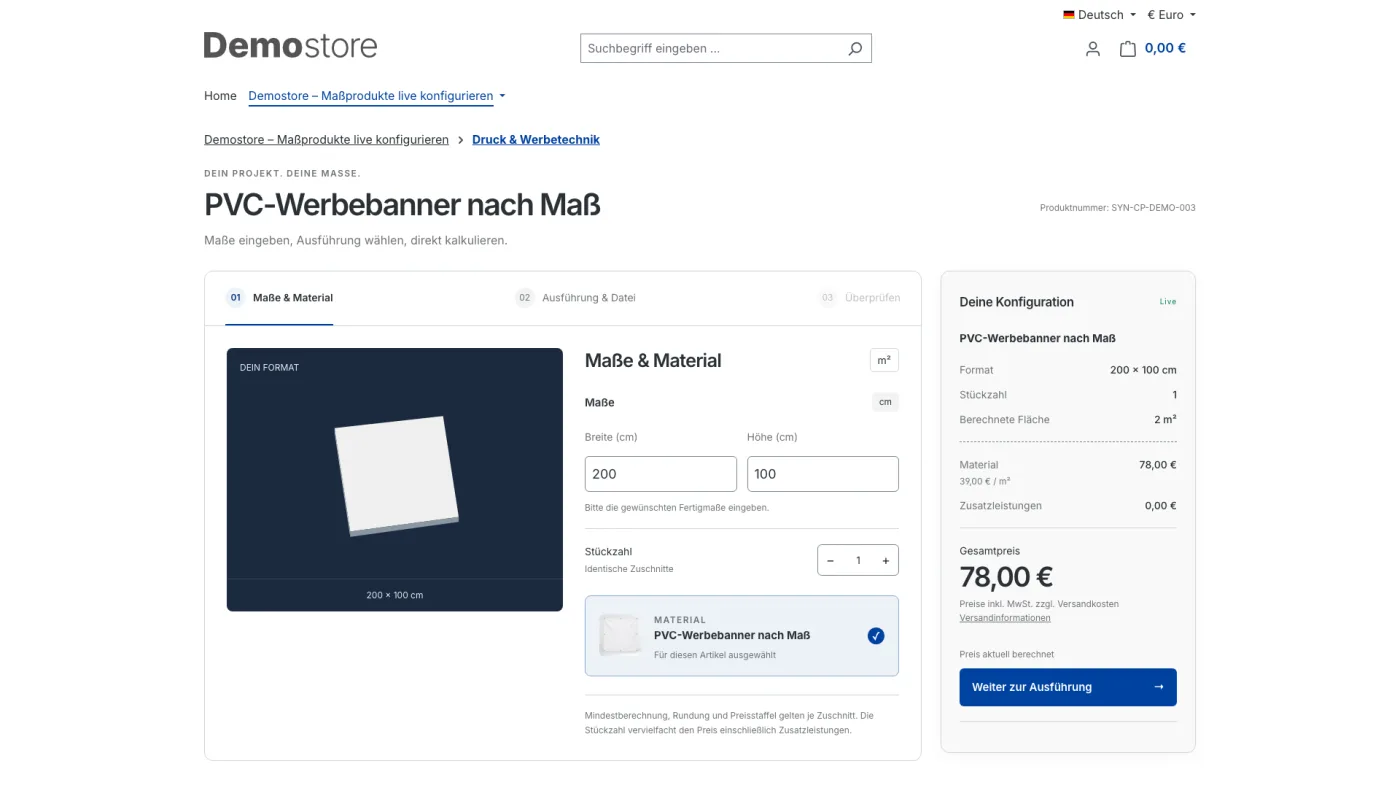
- Maße & Material: Maße und Stückzahl eingeben. Vorschau und Preis aktualisieren sich sofort.
- Ausführung & Zubehör (mit Upload: „Ausführung & Datei“): Zusatzleistungen wählen und gegebenenfalls die Datei hochladen.
- Überprüfen: Zusammenfassung ansehen und in den Warenkorb legen.
Im Warenkorb, im Kundenkonto und in der Bestellbestätigung stehen Maße, berechnete Menge, Zusatzleistungen und Dateiname. Der Preis wird im Warenkorb immer auf dem Server neu berechnet; ungültige Konfigurationen können nicht bestellt werden.

Varianten
Das Plugin arbeitet mit normalen Shopware-Varianten, z. B. Farben. Weisen Sie das Profil dem Hauptartikel zu; alle Varianten übernehmen es.
- Die Variantenauswahl von Shopware steht über dem Konfigurator.
- Der Preis kommt immer aus dem Profil. Der in Shopware gepflegte Variantenpreis wird nicht verwendet. Sollen Farben unterschiedlich kosten, weisen Sie der Variante ein eigenes Profil zu oder bilden die Farbe als Auswahlgruppe mit Aufpreis im Profil ab.
- Im Warenkorb stehen Artikelnummer und Merkmale der gewählten Variante.
- Beim Wechsel der Variante lädt Shopware deren Seite neu. Bitte wählen Sie deshalb zuerst die Variante und geben danach die Maße ein.
Farben und Schriften
Der Konfigurator übernimmt Farben und Schriften aus den Einstellungen Ihres Themes (Primärfarbe, Text-, Überschriften-, Preis-, Rahmen- und Hintergrundfarbe, Erfolgs- und Fehlerfarbe, Schriftarten). Theme-Entwickler können einzelne Farben über CSS-Variablen auf .yorg-detail anpassen, z. B. --yc-accent, --yc-ink, --yc-line. Angepasste Themes und eigene Produktseiten-Layouts sollten vor dem Livebetrieb geprüft werden.
The configurator in the Storefront
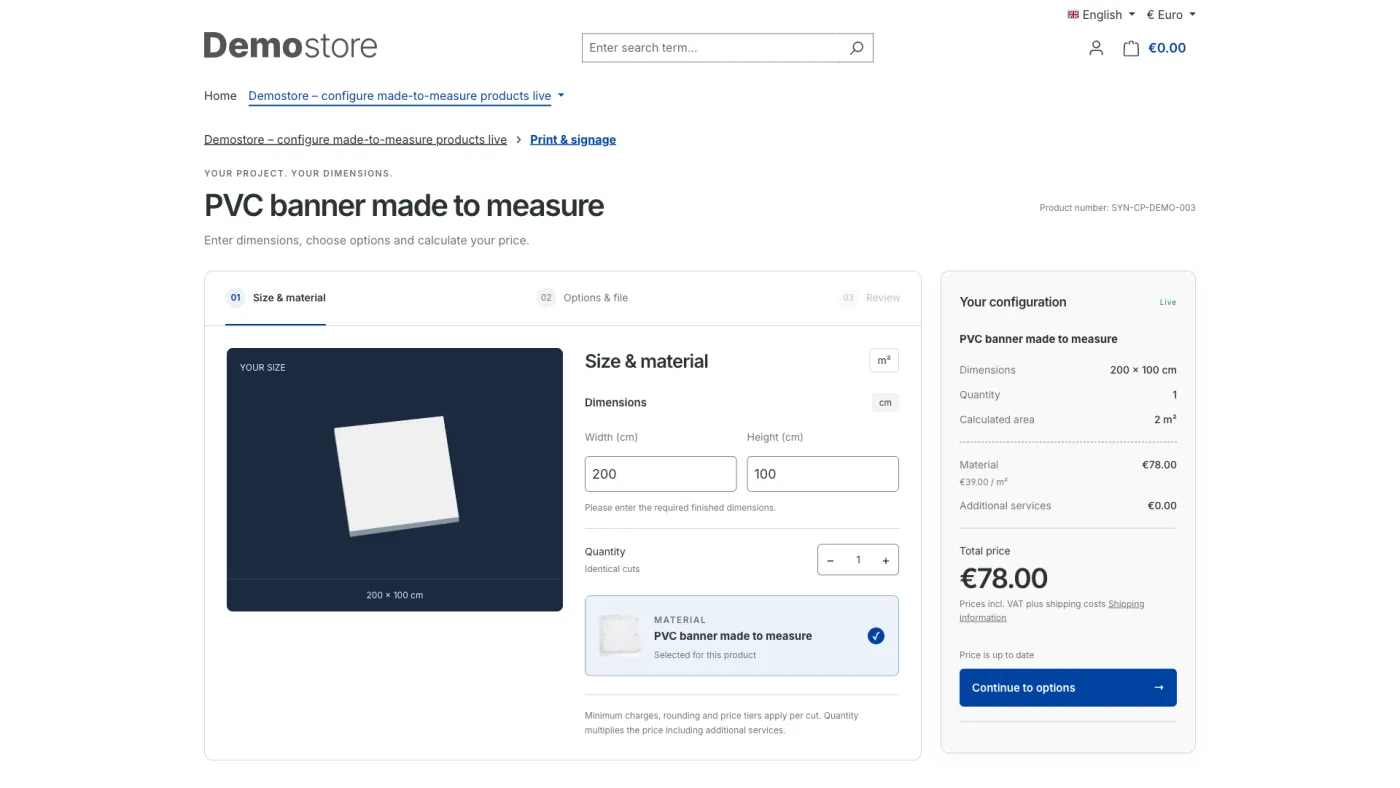
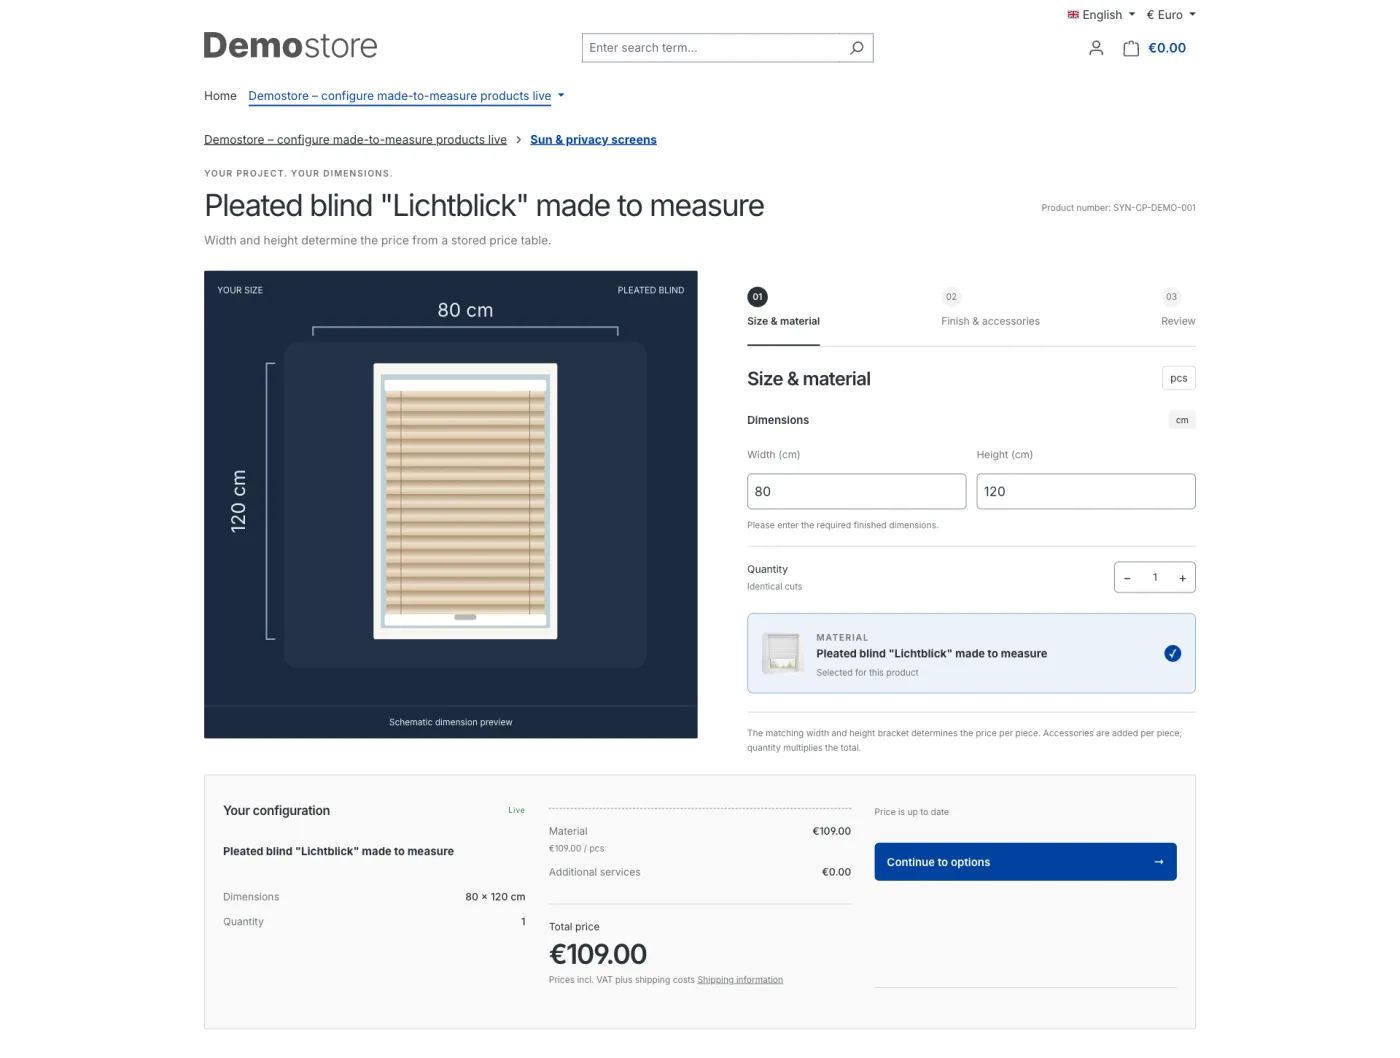
If an active profile is assigned to a product, the configurator replaces the image gallery, buy box and product heading on the product page. Description, reviews and other Shopping Experience content remain below.
Customer journey
- Size & material: enter dimensions and quantity. Preview and price update instantly.
- Finish & accessories (with upload: “Options & file”): choose services and upload the file if needed.
- Review: check the summary and add to cart.
Cart, customer account and order confirmation show dimensions, calculated quantity, services and file name. The price is always recalculated on the server in the cart; invalid configurations cannot be ordered.
Variants
The extension works with regular Shopware variants, e.g. colours. Assign the profile to the parent product; all variants inherit it.
- Shopware’s variant selection is shown above the configurator.
- The price always comes from the profile. The variant price maintained in Shopware is not used. If colours should cost differently, assign the variant its own profile or model the colour as a selection group with a surcharge in the profile.
- The cart shows the product number and properties of the selected variant.
- Switching variants reloads the variant page in Shopware. Customers should therefore choose the variant first and enter dimensions afterwards.
Colours and fonts
The configurator takes colours and fonts from your theme settings (primary colour, text, heading, price, border and background colour, success and error colour, fonts). Theme developers can override individual colours with CSS variables on .yorg-detail, e.g. --yc-accent, --yc-ink, --yc-line. Customised themes and custom product page layouts should be checked before going live.
Bestellungen
Tab „Konfigurator Pro“
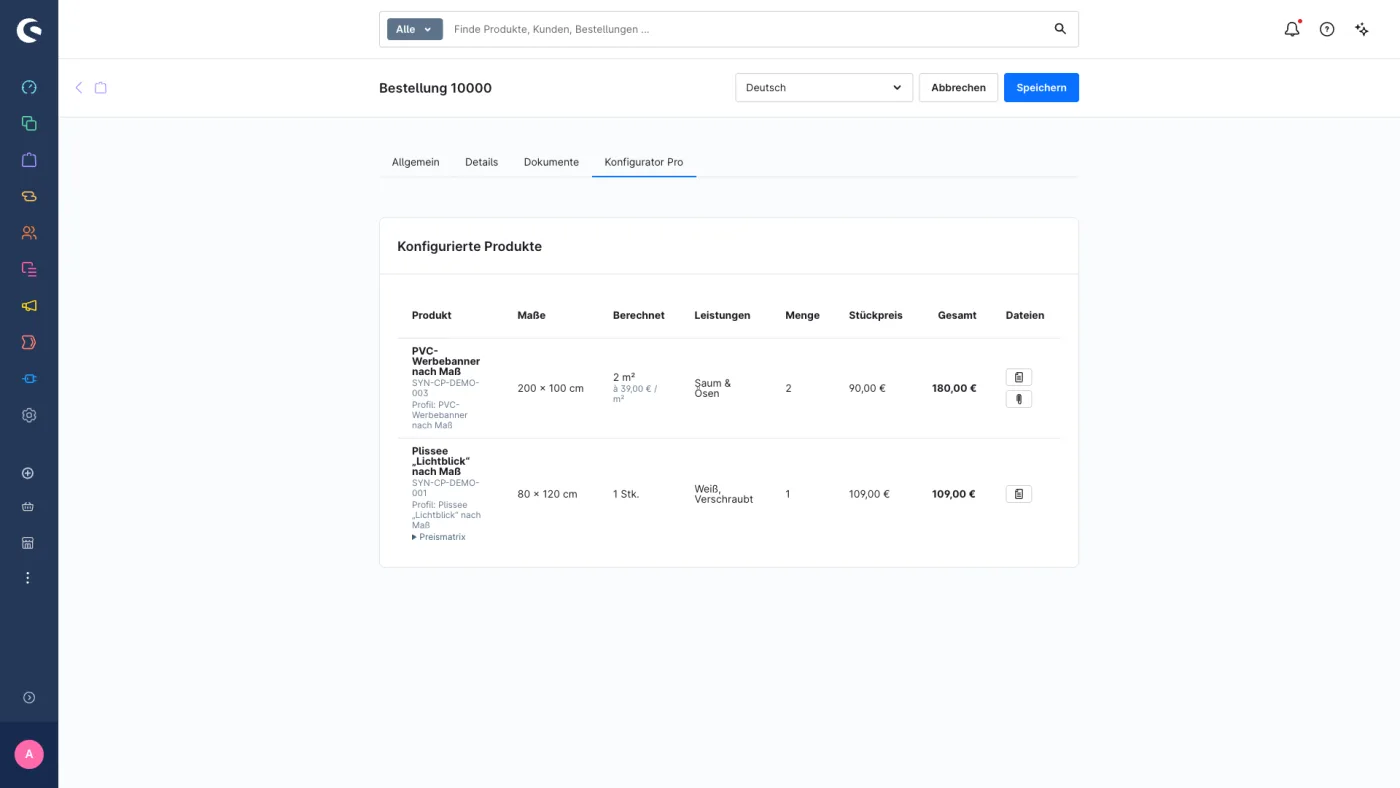
Jede Bestellung mit konfigurierten Produkten hat in der Administration einen eigenen Tab. Er zeigt je Position Produkt, Profil, Maße, berechnete Menge, Zusatzleistungen, Menge, Preise und die Kundendatei. Bei Preismatrizen lassen sich Matrix, Größenstufe und Preisstand aufklappen.
Kundendateien
Dateien liegen im privaten Dateispeicher von Shopware (standardmäßig files/plugins/yorg_configurator_pro/uploads, je nach Shopware-Konfiguration auch z. B. in S3) und sind nur über die Administration abrufbar. Herunterladen dürfen nur Benutzer mit der Berechtigung „Kundendateien herunterladen“.
- Uploads sind auf 20 Anfragen pro Stunde je IP-Adresse und Verkaufskanal begrenzt.
- Dateien werden weder ausgeführt noch entpackt. Ein Virenscanner ist nicht enthalten.
- Nie bestellte Dateien werden nach der eingestellten Frist gelöscht (siehe Plugin-Einstellungen).
Bestellmails und Dokumente
Maße, Zusatzleistungen und Dateiname werden als Shopware-Standardmerkmale der Bestellposition gespeichert. Shopwares Standardmails und -dokumente (z. B. Rechnung, Lieferschein) geben sie ohne weitere Einrichtung aus. Eigene Mail- oder Dokumentvorlagen müssen die Merkmale der Position (lineItem.payload.options) ausgeben.
Fertigungsauftrag
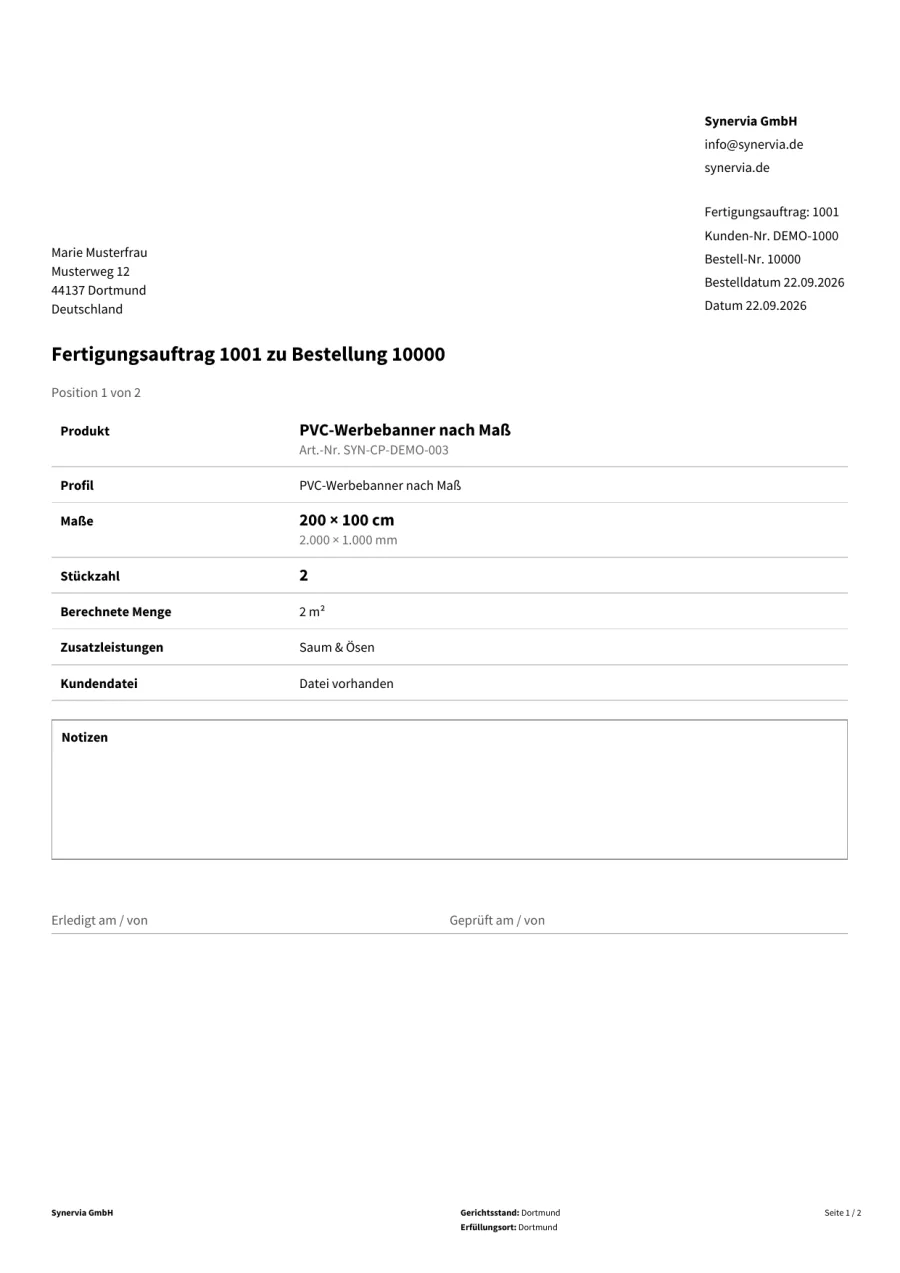
Der Fertigungsauftrag ist ein Shopware-Dokument für die Werkstatt. Er enthält je konfigurierter Position eine Seite mit Produkt, Artikelnummer, Profil, Maßen (zusätzlich in Millimetern), Stückzahl, berechneter Menge, Zusatzleistungen, Kundendatei und Feldern für Notizen sowie „Erledigt am/von“ und „Geprüft am/von“. Preise enthält er nicht.
- Im Tab „Konfigurator Pro“ öffnet das Dokumentsymbol einer Zeile den Fertigungsauftrag auf der Seite dieser Position. Gibt es noch keinen, wird er beim ersten Klick erstellt.
- Wie Rechnung oder Lieferschein steht er im Tab „Dokumente“ und kann dort neu erstellt werden.
- Logo, Firmendaten und Dateiname stellen Sie unter Einstellungen › Dokumente ein, die Nummern unter Einstellungen › Nummernkreise („Fertigungsaufträge“, Start 1000).
Orders
“Configurator Pro” tab
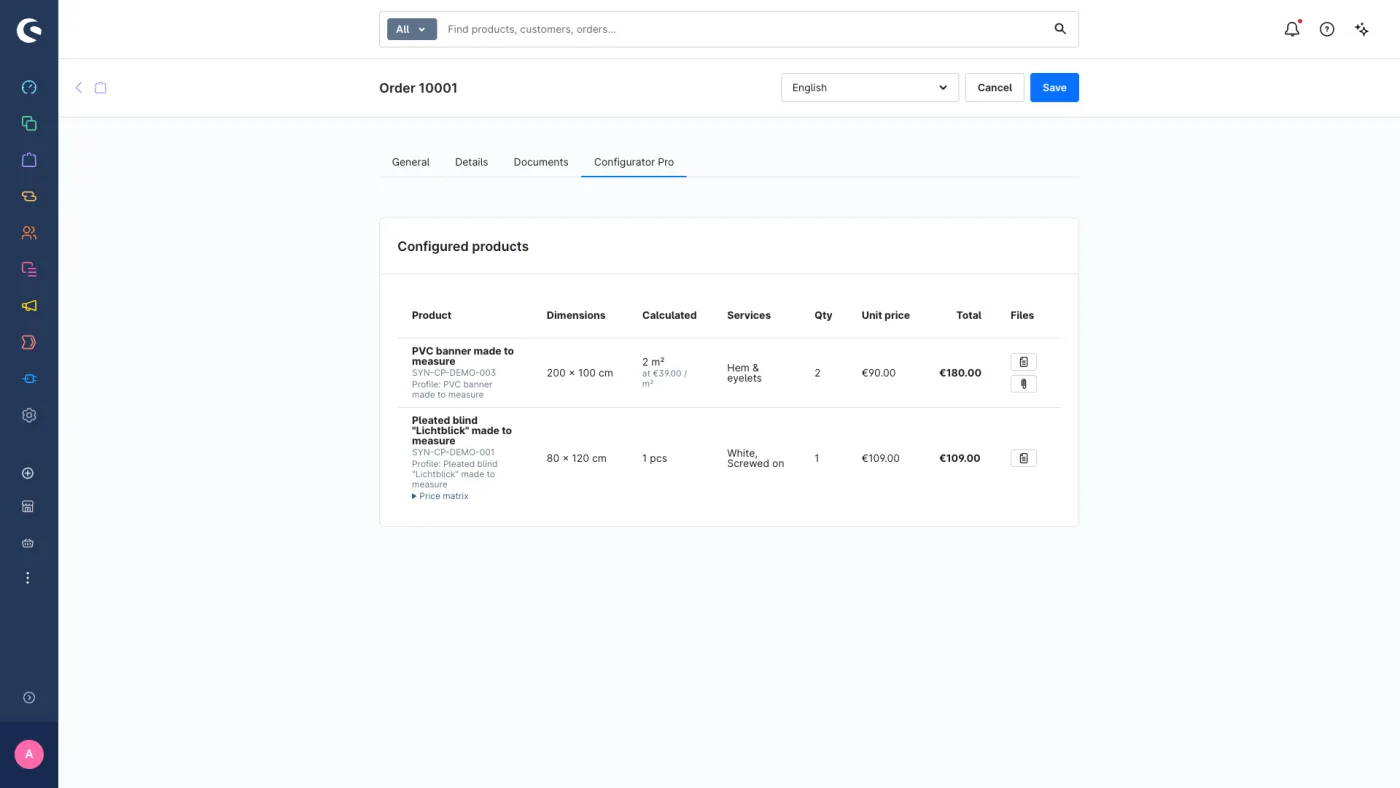
Every order with configured products has its own tab in the Administration. For each line item it shows product, profile, dimensions, calculated quantity, services, quantity, prices and the customer file. For price matrices, matrix, size step and price revision can be expanded.
Customer files
Files are stored in Shopware’s private file storage (by default files/plugins/yorg_configurator_pro/uploads, or e.g. S3 depending on your Shopware configuration) and can only be retrieved via the Administration. Only users with the “Download customer files” permission may download them.
- Uploads are limited to 20 requests per hour per IP address and sales channel.
- Files are never executed or extracted. A virus scanner is not included.
- Files that were never ordered are deleted after the configured period (see Extension settings).
Order emails and documents
Dimensions, services and file name are stored as standard Shopware line item characteristics. Shopware’s standard emails and documents (e.g. invoice, delivery note) show them without further setup. Custom email or document templates must output the line item characteristics (lineItem.payload.options).
Production order
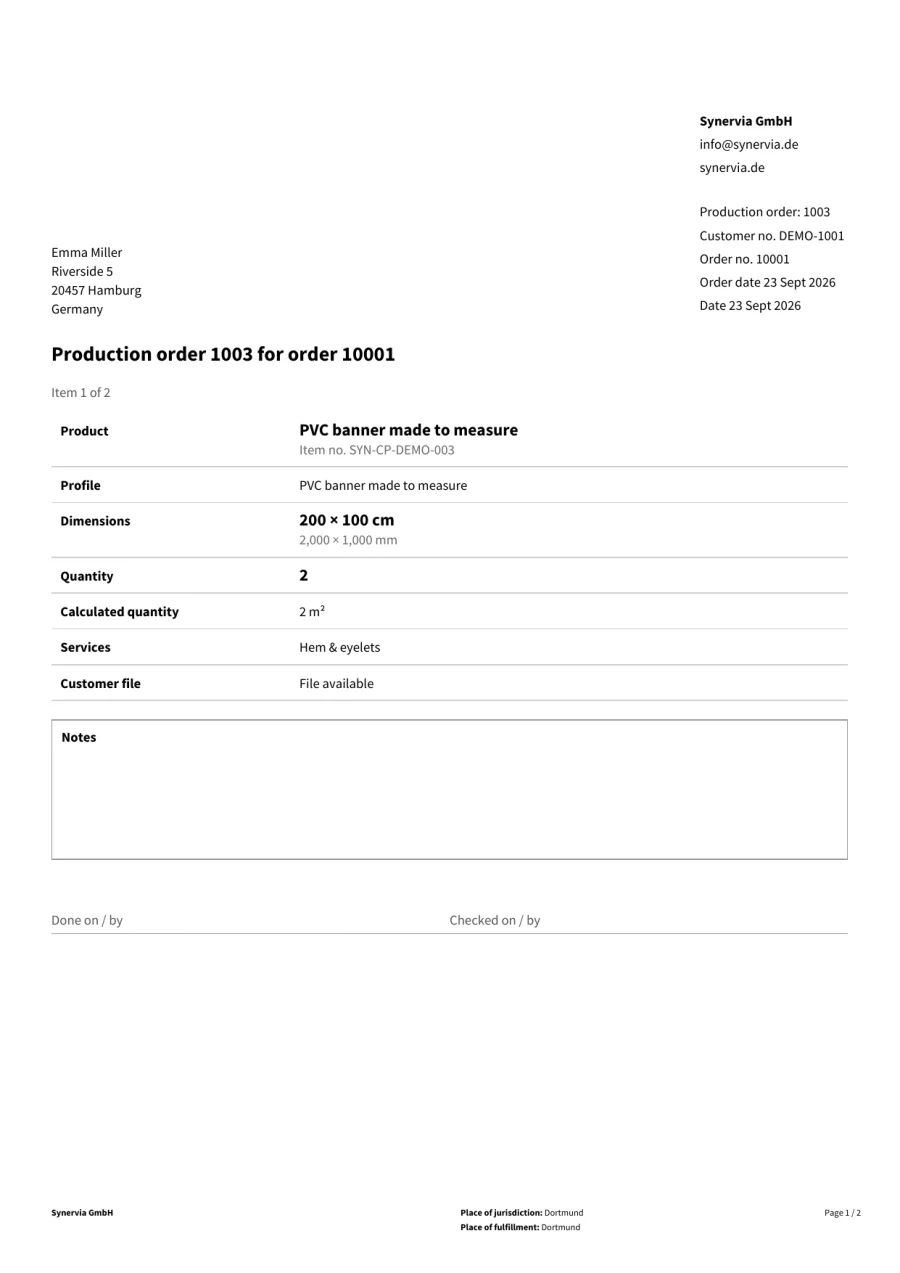
The production order is a Shopware document for your workshop. It contains one page per configured line item with product, product number, profile, dimensions (also in millimetres), quantity, calculated quantity, services, customer file and fields for notes as well as “Done on / by” and “Checked on / by”. It contains no prices.
- In the “Configurator Pro” tab, the document icon of a row opens the production order at that line item’s page. If none exists yet, it is created on the first click.
- Like invoices or delivery notes, it is listed in the “Documents” tab and can be created again there.
- Set logo, company details and file name under Settings › Documents, and the numbers under Settings › Number ranges (“Production orders”, starting at 1000).
Profile übertragen und übersetzen
Exportieren, importieren, duplizieren
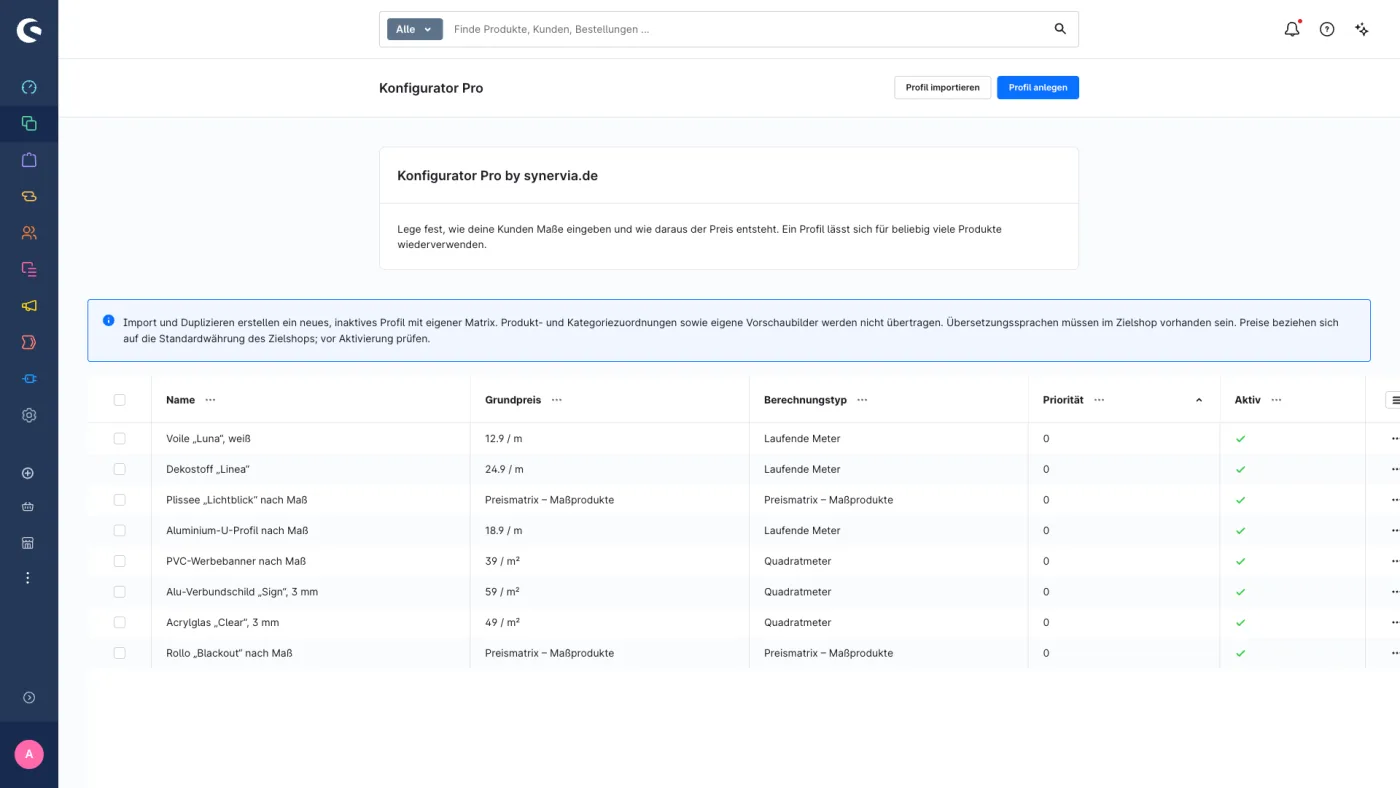
In der Profilliste finden Sie in der Zeilenaktion Profil exportieren und Duplizieren; Profil importieren steht oben (JSON-Datei bis 5 MB).
- Übertragen werden Berechnungsart, Maße, Preise, Staffeln, Zusatzleistungen und Gruppen, Infotexte, eine eigene Kopie der Preismatrix, Texte und Übersetzungen, Upload-Regeln und die Produktansicht.
- Import und Duplizieren erstellen immer ein neues, inaktives Profil. Bestehende Profile werden nie überschrieben.
- Nicht übertragen werden Zuweisungen, Artikel-Ausnahmen der Vorschau und eigene Mediendateien. Bilder und Shopseiten bleiben nur erhalten, wenn sie im Zielshop vorhanden sind.
- Preise gelten in der Standardwährung des Zielshops. Prüfen Sie vor dem Aktivieren Währung und Brutto/Netto.
Übersetzen
Neue Profile und Zusatzleistungen legen Sie in der Standardsprache des Shops an. Danach wählen Sie oben rechts eine andere Sprache und übersetzen Namen und Texte. Leere Felder zeigen den Text der Standardsprache.
Transferring and translating profiles
Export, import, duplicate
In the profile list, the row actions contain Export profile and Duplicate; Import profile is at the top (JSON file up to 5 MB).
- Transferred are calculation type, dimensions, prices, tiers, services and groups, info texts, a separate copy of the price matrix, texts and translations, upload rules and the product layout.
- Import and duplicate always create a new, inactive profile. Existing profiles are never overwritten.
- Not transferred: assignments, preview overrides and custom media files. Images and shop pages are only kept if they exist in the target shop.
- Prices apply in the target shop’s default currency. Check currency and gross/net before activating.
Translating
Create new profiles and services in the shop’s default language. Then choose another language at the top right and translate names and texts. Empty fields show the default language text.
Deinstallation und Daten
| Variante | Was passiert |
|---|---|
| Deinstallieren, Daten behalten | Profile, Matrizen, Dateien und Tabellen bleiben erhalten; eine spätere Neuinstallation findet alles wieder. |
| Deinstallieren mit „Alle Daten entfernen“ | Tabellen, Upload-Dateien, Fertigungsaufträge, Dokumenttyp und Nummernkreis werden entfernt. Andere Bestelldokumente bleiben unberührt. |
Bestellarchiv: Ist „Privates Bestellarchiv bei Datenlöschung erhalten“ aktiv (Voreinstellung), kopiert das Plugin vor dem Löschen alle bestellten Dateien mit einer manifest.json nach files/plugins/yorg_configurator_pro/order-archive/. Das Archiv ist nicht öffentlich erreichbar und wird nicht automatisch gelöscht; Aufbewahrung und Sicherung liegen bei Ihnen. Misslingt die Archivierung, bricht die Datenlöschung ab.
Bilder von Zusatzleistungen und Info-Fenstern bleiben in jedem Fall in der Medienverwaltung erhalten.
Protokolle schreibt das Plugin nach var/log/yorgConfiguratorPro-<Datum>.log (bis zu 14 Dateien). Sie enthalten technische Kennungen, aber keine Dateiinhalte oder Originaldateinamen.
Uninstalling and data
| Option | What happens |
|---|---|
| Uninstall, keep data | Profiles, matrices, files and tables are kept; a later reinstallation finds everything again. |
| Uninstall with “Remove all data” | Tables, uploaded files, production orders, the document type and its number range are removed. Other order documents are not affected. |
Order archive: if “Keep a private order archive when removing plugin data” is on (default), the extension first copies all ordered files with a manifest.json to files/plugins/yorg_configurator_pro/order-archive/. The archive is not publicly accessible and is never deleted automatically; retention and backup are your responsibility. If archiving fails, data removal is aborted.
Images of services and info dialogs always remain in the media library.
The extension writes logs to var/log/yorgConfiguratorPro-<date>.log (up to 14 files). They contain technical identifiers but no file contents or original file names.
Häufige Fragen und Fehlerbehebung
Der Konfigurator erscheint nicht auf der Produktseite.
Ist das Profil aktiv und dem Produkt, seinem Hauptartikel oder einer Kategorie zugewiesen? Ist der Konfigurator für diesen Verkaufskanal aktiviert? Danach den Shop-Cache leeren.
Es erscheint ein anderes Profil als erwartet.
Mehrere Profile passen auf das Produkt. Direkte Zuweisungen gehen vor Kategorien; sonst entscheidet die Priorität (siehe Zuweisungen).
Der Kunde sieht „Bitte überprüfen Sie Ihre Eingaben.“ und keinen Preis.
Die Maße liegen außerhalb der Grenzen, verletzen die Schrittweite oder treffen in der Matrix auf X. Prüfen Sie Maße und Matrix mit der Testberechnung.
Das Profil lässt sich nicht speichern.
Ein ungespeicherter Matrixentwurf blockiert das Speichern: erst Matrix speichern, dann das Profil. Die Fehlermeldung oben nennt weitere fehlende Angaben.
Der Upload bricht ab.
Dateityp oder Größe passen nicht zum Profil, oder das Limit des Hostings (z. B. upload_max_filesize) ist kleiner. Das Plugin zeigt den Grund farbig an.
Kundendateien lassen sich nicht herunterladen.
Der Rolle fehlt die zusätzliche Berechtigung „Kundendateien herunterladen“.
Maße fehlen in eigenen Mail- oder Dokumentvorlagen.
Die Vorlage muss die Merkmale der Position (lineItem.payload.options) ausgeben, wie die Shopware-Standardvorlagen.
Das Dokumentsymbol für den Fertigungsauftrag fehlt.
Der Fertigungsauftrag setzt Shopware 6.7 voraus. Nach einem Shopware-Update das Plugin einmal aktualisieren oder deaktivieren und wieder aktivieren.
FAQ and troubleshooting
The configurator does not appear on the product page.
Is the profile active and assigned to the product, its parent product or a category? Is the configurator enabled for this sales channel? Then clear the shop cache.
A different profile appears than expected.
Several profiles match the product. Direct assignments take precedence over categories; otherwise priority decides (see Assignments).
The customer sees “Please check your input.” and no price.
The dimensions are outside the limits, violate the step size or hit X in the matrix. Check dimensions and matrix with the test calculation.
The profile cannot be saved.
An unsaved matrix draft blocks saving: click Save matrix first, then save the profile. The message at the top names any other missing details.
The upload fails.
File type or size does not match the profile, or your hosting limit (e.g. upload_max_filesize) is lower. The extension shows the reason highlighted in colour.
Customer files cannot be downloaded.
The role lacks the additional permission “Download customer files”.
Dimensions are missing in custom email or document templates.
The template must output the line item characteristics (lineItem.payload.options), like Shopware’s standard templates.
The production order icon is missing.
The production order requires Shopware 6.7. After a Shopware update, update the extension once or deactivate and reactivate it.
Support
Bei Fragen erreichen Sie uns direkt. Bitte nennen Sie Shopware-Version, Plugin-Version und, wenn möglich, den Namen des Profils.
- E-Mail: info@synervia.de
- Live-Demo: configurator.synervia.de
- Handbuch als PDF: Deutsch · English
- Support-Seite: synervia.de/support
Support
If you have questions, contact us directly. Please include your Shopware version, the extension version and, if possible, the profile name.
- Email: info@synervia.de
- Live demo: configurator.synervia.de
- Manual as PDF: English · Deutsch
- Support page: synervia.de/support